Introduction
This documentation contains the instructions for integrating Apple Pay as an in-app purchase option using the Moneris Gateway iOS API for Canada. It contains specifications for transaction requests and responses.
System and Skill Requirements
- XCode 6.3 or higher
- Knowledge of Objective C or Swift
- iOS 8.0 or higher
Getting Started With Apple Pay
In order to integrate your Apple Pay In-App payment solution, there are a few basic tasks you have to do to begin:
- Boarding your Apple Pay credentials with Moneris
- Developing a demo shopping cart application for Apple Pay In-App in order to test functionality
- Customizing your project's code to work with the Moneris Gateway
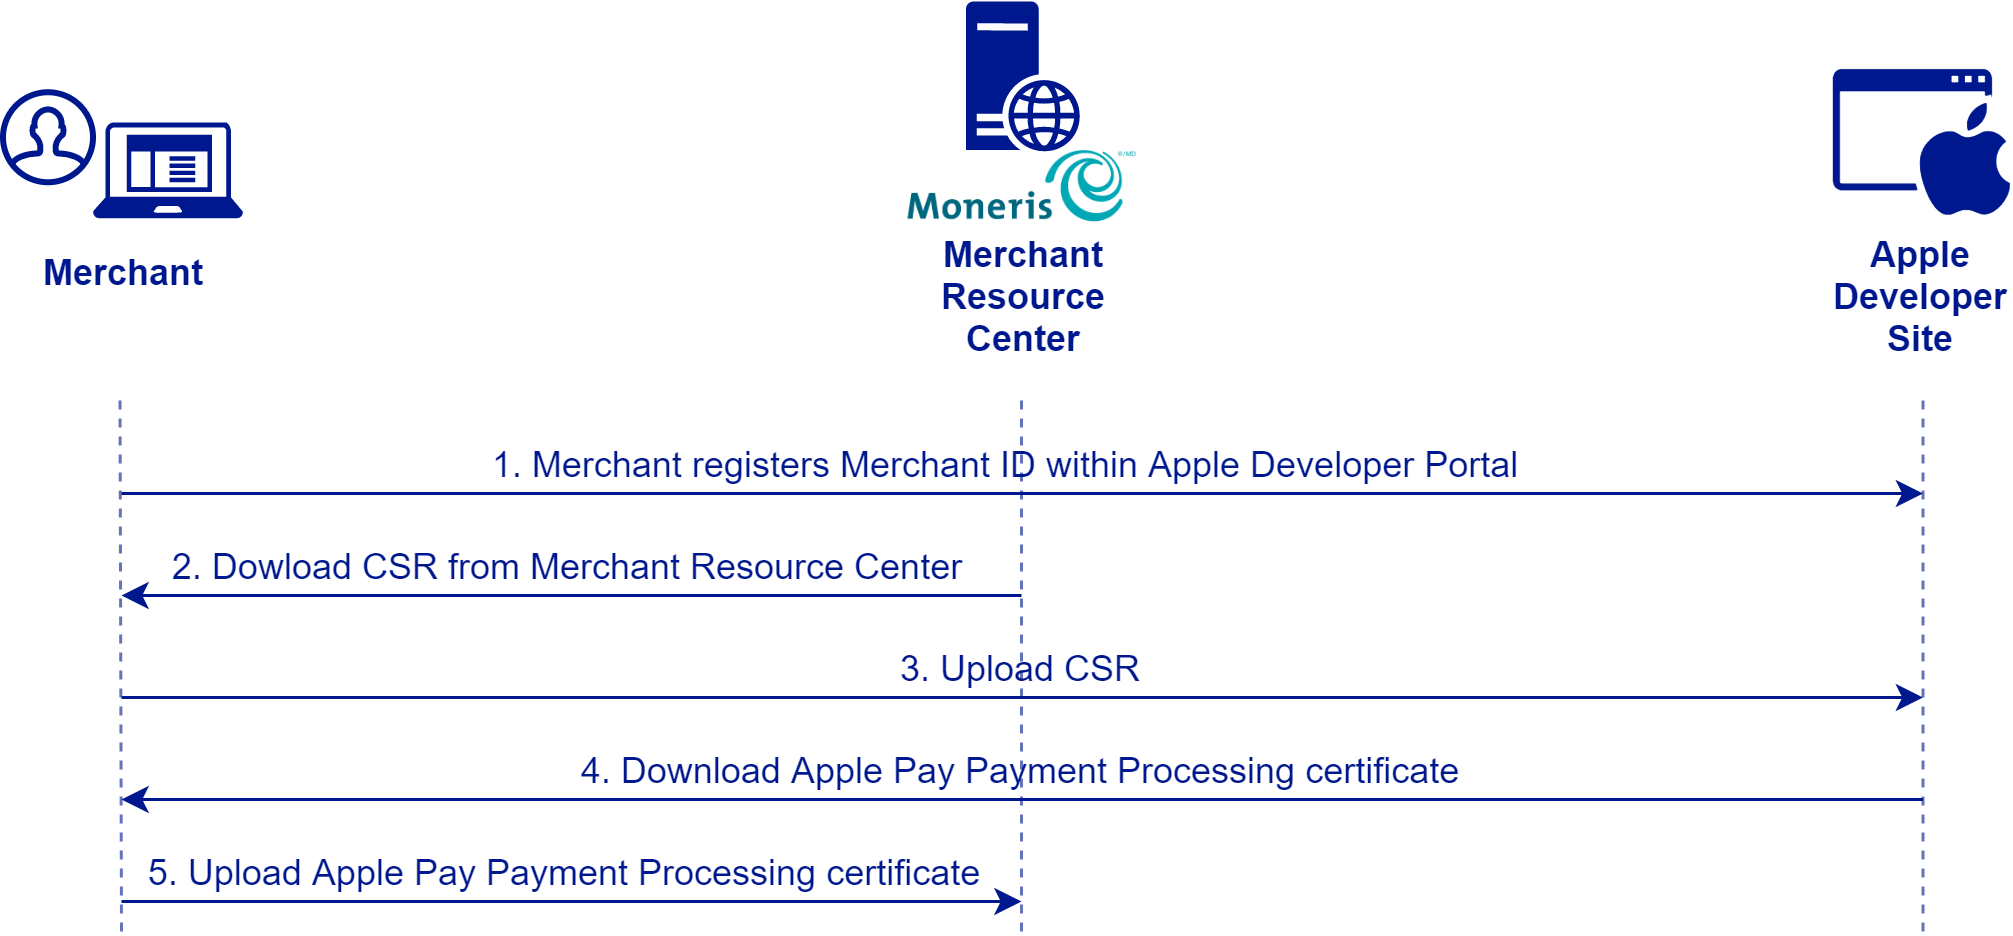
Onboarding In-App
To board your credentials for an Apple Pay In-App solution, there are six basic initial steps:
- Registering an Apple merchant ID at the Apple Developer Portal
- Downloading a CSR file from the Moneris Merchant Resource Center
- Uploading the CSR file to Apple
- Downloading a signed Apple Pay Payment Processing Certificate from Apple
- Uploading the signed Apple Pay Payment Processing Certificate to the Merchant Resource Center
1. Registering an Apple Merchant ID
The first required step for the boarding process for your Apple Pay In-App is to get a Apple merchant ID on the Apple Developer Portal at developer.apple.com.
2. Downloading a CSR from Merchant Resource Center
Use your Apple merchant ID, also referred to as your Vendor ID, to obtain a client signing certificate (CSR) from the Moneris Merchant Resource Center.
To download your CSR from the Merchant Resource Center:
- Go the Moneris Merchant Resource Center at one of the following URLs, depending on your stage of development:
Testing/QA: https://esqa.moneris.com/mpg
Production: https://www3.moneris.com/mpg
- On the navigation bar at the top, select Admin > Apple Pay
- In the fields under the Download CSR section, enter your Apple merchant ID and an email address as a point of contact
- Click Download CSR to get the certification signing request (CSR) file from Moneris
3. Uploading the CSR to Apple
Once you have downloaded the CSR from the Moneris Merchant Resource Center, you upload it to the Apple Developer Portal at developer.apple.com.
The CSR from Moneris is required before Apple will issue you a Apple Pay payment processing certificate in the next step.
NOTE: This procedure or some of its details may change at the discretion of Apple, please refer to the Apple Developer Portal for the most up-to-date information.
To upload the CSR to the Apple Developer Portal:
- In the Apple Developer Portal, go to Identifiers > Merchant IDs
- Under the Apple Pay Payment Processing Certificate section click Create Certificate
- Click Continue
- In the Generate your certificate step, choose the CSR file from its location and click Upload
4. Downloading a Signed Apple Pay Payment Processing Certificate
After you have uploaded your Moneris Payment Processing CSR to the Apple Developer Portal, Apple gives you the option to download the signed Apple Pay payment processing certificate.
NOTE: This procedure or some of its details may change at the discretion of Apple, please refer to the Apple Developer Portal for the most up-to-date information.
To download the signed Apple Pay payment processing certificate, click Download and save it to your device.
5. Uploading the Signed Certificate to MRC
Once you have the signed Apple Pay Payment Processing Certificate, you upload it to the Merchant Resource Center in order to complete the boarding process for the Apple Pay In-App solution.
To upload the signed Apple Pay Payment Processing Certificate to the Merchant Resource Center:
- Select Admin > Apple Pay in the Merchant Resource Center
- Under the heading Apple Merchant Certificates, find the row with your Vendor ID (i.e., the Apple merchant ID)
- Click the Upload Apple Signed Certificate button in that row
- Choose the certificate from its location on your device to upload it.
Developing an Apple Pay Demo App
In order to test the functionality of your Apple Pay solution with the Moneris Gateway, you first need a demo shopping cart application.
Apple provides some examples for Apple Pay In-App on the Apple developer portal for developers to use in integrating their Apple Pay solutions.
For an example of a Apple Pay In-App demo app example:
https://developer.apple.com/library/content/samplecode/Emporium/Introduction/Intro.html
Integrating your demo app with Moneris Gateway
In order for your Apple Pay payment application to use the Moneris Gateway, you need to customize your application code.
In the Apple Pay In-App demo app example, you modify the following files:
ViewController.swift
In the Apple Pay on the Web demo app example, you modify the following files:
index.js

index.html
If you will be processing INTERAC® payments via Apple Pay, there is an additional step. See Enabling INTERAC® e-Commerce Transactions.
Enabling INTERAC e-Commerce Transactions
If your merchant application will be processing INTERAC® e-Commerce debit transactions through Apple Pay, you will need to do additional steps to ensure this feature works.
Before processing INTERAC® e-Commerce transactions, you will also need to have that functionality enabled by your Moneris sales representative.
To enable your Apple Pay integration to process INTERAC® e-Commerce transactions:
- Ensure your merchant account with Moneris has INTERAC® e-Commerce functionality turned on; your Moneris sales representative can do this for you
- In your payment page code, under the function applePayButtonClicked(), insert
'interac' into the code as shown:
supportedNetworks:[ 'amex', 'discover', 'masterCard', 'visa', 'interac'],
Transaction Types
Moneris Gateway Apple Pay SDK supports the following transactions:
- Apple Pay Purchase
- Apple Pay Pre-Authorization
Once you have processed the initial transaction using Apple Pay Purchase or Apple Pay Pre-Authorization, you
can use the Moneris Gateway Unified API or Batch Upload solution to process one of the following supplemental transactions:
NOTE: INTERAC® e-Commerce transaction functionality is currently available only when
processing a Purchase transaction.
In addition, the Moneris Gateway Apple Pay SDK also supports optional features, such as Customer
Information and recurring transactions.
Apple Pay Token Purchase
The Apple Pay Token Purchase transaction verifies funds on the customer’s card, removes the funds and
readies them for deposit into the merchant’s account.
@interface ApplePayTokenPurchase
Required transaction objects – Apple Pay Token Purchase
Optional transaction objects – Apple Pay Token Purchase
Apple Pay Token Pre-Authorization
The Apple Pay Token Pre-Authorization verifies and locks funds on the customer’s credit card. The funds are locked for a specified amount of time, based on the card issuer. A subsequent Pre-Authorization Completion transaction must be performed for the funds to settle into the merchant’s account.
This transaction can only be performed on a credit card.
@interface ApplePayTokenPreauth
Required transaction objects – Apple Pay Token Pre-Authorization
Optional transaction objects – Apple Pay Token Pre-Authorization
Testing your Solution
For testing your Apple Pay In-App solution, you will need to:
- Complete the onboarding process
- Get a unique test Store ID and API token
- Get Apple merchant ID
- Configure code in the MpgRequest object
Getting a Unique Test Store ID and API Token
Transactions requests via the Moneris Gateway API will require you to have a Store ID and a corresponding
API token.
For testing purposes, you can either use the pre-existing test stores with the corresponding test
API tokens, or you can create your own unique test API token and a unique test store where you will only
see your own transactions.
To get your unique Store ID and API token for testing:
- Log in to the Developer Portal
- In the My Profile dialog, click the Full Profile button
- Under My Testing Credentials, select Request Testing Credentials
- Enter your Developer Portal password and select your country
- Record the Store ID and API token that are given, as you will need them for logging in to the Merchant
Resource Center (Store ID) and for API requests (API token).
Alternatively, you can use the pre-existing test stores already set up in the Merchant Resource Center as
described in the following section
Test Store Credentials
For testing purposes, you can either use the pre-existing test stores with the corresponding test
API tokens, or you can create your own unique test API token and a unique test store where you will only
see your own transactions. If you want to use pre-existing stores, use the test credentials provided in the
following table.
Configuring MpgRequest Object for Testing
To configure the MpgRequest object in your Apple Pay In-App solution for testing:
- Insert your test Store ID and test API token
- Change the setTestMode value to YES
MpgRequest object code for testing is shown below.
Moving to Production
To move your Apple Pay In-App solution into production you need to:
- Complete the onboarding process
- Get production Store ID and API token
- Get Apple merchant ID
- Configure code in the MpgRequest object
Getting a Production Store ID and API Token
In production, you use the Store ID that was given in your activation letter from Moneris. You obtain the
production API token from the production Merchant Resource Center.
To get your production API token:
If you have not already done so, activate your production account at
https://www.moneris.com/activate
The activation process provides you with your first administrator user for the Merchant Resource
Center.
Once activated, log in to the production Merchant Resource Center at
https://www3.moneris.com/mpg
- Select the Admin menu and choose Settings. Your production API token is located under the
API token heading on the page.
Configuring MpgRequest Object for Production
To configure the MpgRequest object in your Apple Pay In-App solution for production:
- Insert your production Store ID and production API token
- Change the setTestMode value to NO
MpgRequest object code for production is shown below.
Verifying your Transactions
When you send a Preload transaction, you must include a transaction amount and a receipt URL, hosted on your back-end server. The Moneris Gateway sends the transaction response to your receipt URL so that you can verify the amount you sent in the transaction request matches the one coming back in the response from the Moneris Gateway.
As a secondary check, you can also manually look at your transactions in the Moneris Merchant Resource Center.
To use the Merchant Resource Center to verify your transactions have processed:
- Log in to the Merchant Resource Center at https://esqa.moneris.com/mpg (testing) or
https://www3.moneris.com/mpg (production)
- Find your transactions under Reports > Transactions
MpgTransactionRequest Properties
Request Fields
Mandatory Request Fields
Optional CustInfo Request Fields
The customer information section is optional, but if included, all of the fields below are mandatory and must be populated, though they can be populated with a blank value.
Shipping Information
Optional Recurring Billing Fields
The recurring billing section is optional, but if included, all of the fields below are mandatory and must be populated.
Response Fields
| Variable |
Limits |
Description |
| ReceiptId |
50 – character alphanumeric |
The order id specified in the request will be echoed back in the response. This field is recommended to be displayed on the receipt for tracking and troubleshooting purposes. |
| ReferenceNum |
18 – character numeric |
This is a bank transaction reference number. The entire reference number must be displayed on the receipt. This information should also be stored by the merchant. The following illustrates the breakdown of this field where "660123450010690030” is the reference number returned in the message. Example: 660123450010690030
- 66012345: Terminal ID
- 001: Shift number
- 069: Batch number
- 003: Transaction number within the batch.
Format: nnnnnnnnnnnnnnnnnn (18 digits) |
| ResponseCode |
3 – character numeric |
The response code is used to determine whether the transaction was approved or declined. The receipt message is determined by the Response Code and the ISO code.
| Response Code |
Result |
| 0 – 49 (inclusive) |
Approved |
| 50 – 999 (inclusive) |
Declined |
| null |
Incomplete |
Custom Apple Pay SDK Responses:
| ResponseCode |
Message |
Definition |
| 900 |
Global Error |
Unable to decrypt payload |
For a full list of response codes and the associated message please refer to the Financial Response Codes. |
| ISO |
2 – character numeric |
The ISO code is a bank issued response code. The ISO code and the response code are used to determine the receipt message. |
| AuthCode |
8 – character alphanumeric |
The authorization code is returned by the issuer as part of the transaction response. This field must be displayed on the receipt. |
| TransTime |
HH:II:SS |
Processing host time stamp. Time of the transaction. Must be displayed on the transaction receipt. Format: HH:II:SS HH = 2 digit hour, 24 hour clock (“0” left padded | 02 = 2am, 14 = 2pm) II = 2 digit minute (“0” left padded) SS = 2 digit seconds (“0” left padded |
| TransDate |
YYYY-MM-DD |
Processing host date stamp. Date of the transaction. Must be displayed on the transaction receipt. Format: YYYY-MM-DD YYYY = 4 digit year MM = 2 digit month (“0” left padded | Jan = 01) DD = 2 digit day of month (“0” left padded) |
| TransType |
2 – character numeric (variable length) |
Transaction Type defines what type of transaction was performed. See below for definitions. A full description of the type of transaction performed must be displayed on the transaction receipt (Sale, Refund, . . . )
00 – Sale
01 – Authorization (Credit Cards only)
|
| Complete |
true/false |
Transaction was sent to authorization host and a response was received |
| Message |
100 – character alphanumeric (variable length) |
Response description returned from issuing institution. The response message indicating in details whether the transaction was Approved or Declined. |
| TransAmount |
9 decimal (variable length) |
Returns the amount sent in request for processing. The amount represents the amount that the cardholder was charged/refunded. The amount must be displayed on the receipt. Format: nnnnnnN.NN The amount will always contain one (1) dollar value and two (2) cent values separated by a period “.”. N = always returned n = returned when required |
| CardType |
2 – character alphanumeric (variable length) |
CardType defines the card type used for a transaction. See below for definitions. On the transaction receipt the Card Type field must be displayed as “Account” and must be displayed with the full description of the card (Visa, MasterCard . . .)
M = MasterCard
V = Visa
AX = American Express
NO = Novus/Discover in (Canada only)
DS= Discover (US only)
C = JCB (US only)
C1 = JCB (Canada only)
SE = Sears (Canada only)
P = Pin Debit (US only)
D = Debit (Canada only) |
| TransID |
20 – character alphanumeric (variable length) |
The transaction number is an identifier used by Moneris Gateway to identify the transaction. This value is used for follow-on transactions (void, capture, refund). It does not need to be displayed on the receipt but should be stored in the application database. |
| TimedOut |
true/false |
Transaction failed due to a process timing out |
| Ticket |
n/a |
reserved |
| DeviceManufacturerIdentifier |
12 – character alphanumeric |
Token requestor ID. Returned from decrypted payload. Hex-encoded device manufacturer identifier. |
| CAVV |
40 – character alphanumeric |
Decrypted CAVV value for the transaction. Returned for Apple Pay Purchase/Pre-Authorization transaction if payload is successfully decrypted. |
| CorporateCard |
true/false |
Indicates whether the card is a corporate card or not |
| RecurSucess |
true/false |
Indicates whether the transaction successfully registered. |
| AvsResultCode |
1 – character alphanumeric |
Indicates the address verification result: Please refer to the AVS Result Codes table for list of possible results. |
| CvdResultCode |
2 – character alphanumeric |
The CVD response is an alphanumeric 2 byte variable. The first byte is the numeric CVD indicator; the second byte would be the response code. The CVD value is keyed on the PINpad when doing a manually keyed transaction. Please refer to the CVD Result Codes table for list of possible results. |
| IsVisaDebit |
true/false/null |
Indicates whether the card that the transaction was performed on is Visa debit.
- true = Card is Visa Debit
- false = Card is not Visa Debit
- null = there was an error in identifying the card
|
| Bank Totals |
Object
N/A |
Response data returned in a Batch Close and Open Totals request.
|
Error Messages
Error messages that are returned if the gateway is unreachable
Global Error Receipt – You are not connecting to our servers. This can be caused by a firewall or your internet connection.
Response Code = NULL – The response code can be returned as null for a variety of reasons. A majority of the time the explanation is contained within the Message field. When a ‘NULL’ response is returned it can indicate that the Issuer, the credit card host, or the gateway is unavailable, either because they are offline or you are unable to connect to the internet. A ‘NULL’ can also be returned when a transaction message is improperly formatted.
Error messages that are returned in the Message field of the response
Message: XML Parse Error in Request: <System specific detail>
Cause: For some reason an improper XML document was sent from the API to the servlet
Message: XML Parse Error in Response: <System specific detail>
Cause: For some reason an improper XML document was sent back from the servlet
Message: Transaction Not Completed Timed Out
Cause: Transaction times out before the host responds to the gateway
Message: Request was not allowed at this time
Cause: The host is disconnected
Message: Could not establish connection with the gateway: <System specific detail>
Cause: Gateway is not accepting transactions or server does not have proper access to internet
Message: Input/Output Error: <System specific detail>
Cause: Servlet is not running
Message: The transaction was not sent to the host because of a duplicate order id
Cause: Tried to use an order id which was already in use
Message: The transaction was not sent to the host because of a duplicate order id
Cause: Expiry Date was sent in the wrong format
Vault error messages
Message: Can not find previous
Cause: Data key provided was not found in our records or profile is no longer active.
Message: Invalid Transaction
Cause: Transaction cannot be performed because improper data was sent or Mandatory field is missing or an invalid SEC code was sent.
Message: Malformed XML
Cause: Parse error.
Security Requirements
It is important to note that all Merchants and Service Providers that store, process, or transmit cardholder data must comply with PCI DSS and the Card Association Compliance Programs. However, validation requirements vary by business and are contingent upon your "Merchant Level" or "Service Provider Level". Failure to comply with PCI DSS and the Card Association Compliance Programs 2.0 may result in a Merchant being subject to fines, fees or assessments and/or termination of processing services. Non-compliant solutions may prevent merchants boarding with Moneris Solutions.
As a Moneris Solutions client or partner using this method of integration, your solution must demonstrate compliance to the Payment Card Industry Data Security Standard (PCI DSS) and/or the Payment Application Data Security Standard (PA DSS) 2.0. These standards are designed to help the cardholders and merchants in such ways as they ensure credit card numbers are encrypted when transmitted/stored in a database and that merchants have strong access control measures, logging, secure software updates, secure remote access and support.
For further information on PCI DSS and PA DSS requirements, please visit http://www.pcisecuritystandards.org.
For more information on how to get your application PCI-DSS compliant, please contact our Integration Specialists and download the PCI-DSS Implementation Guide.