

KONEK
Overview
KONEK™ is the new digital payment gateway solution offered by Interac®. It enables consumers to shop online and pay for goods and services directly through their Financial Institutions (Pay By Bank Service). The payment flow of KONEK transactions connects Merchants, Acquirers, Interac®, Financial Institutions (FIs), and other card networks. Payment methods offered with the new solution include:
- Account‑Based Payments (Pay By Bank): Customers can pay directly from their bank account using the credentials they already trust. This reduces dependence on cards and can lower operational friction for merchants.
- Card‑Based Payments: KONEK also supports debit and credit card transactions, providing continuity for your existing checkout flows.
Interac Direct is a new API service offered by Interac® for processing Account-Based Payments initiated through the KONEK digital payment service. Interac Direct offers all the functional capabilities for a digital commerce payment option. Transaction types supported with Interac Direct solution include One-Time payment, pre-authorized payments, and refund transactions.
Moneris API Merchant Integration
To start using KONEK as an Moneris API merchant, there are two main components you need to set up:
- Implement the KONEK SDK.
- Implement the KONEK Consent Management flow using Moneris APIs (KONEK).
Account enablement required
KONEK must be enabled on your Moneris API Store Profile before you can integrate. Contact your Moneris client consultant to request enablement and to obtain the Moneris API Specification that accompanies this guide.
Email:
API Merchants - KONEK Flowchart
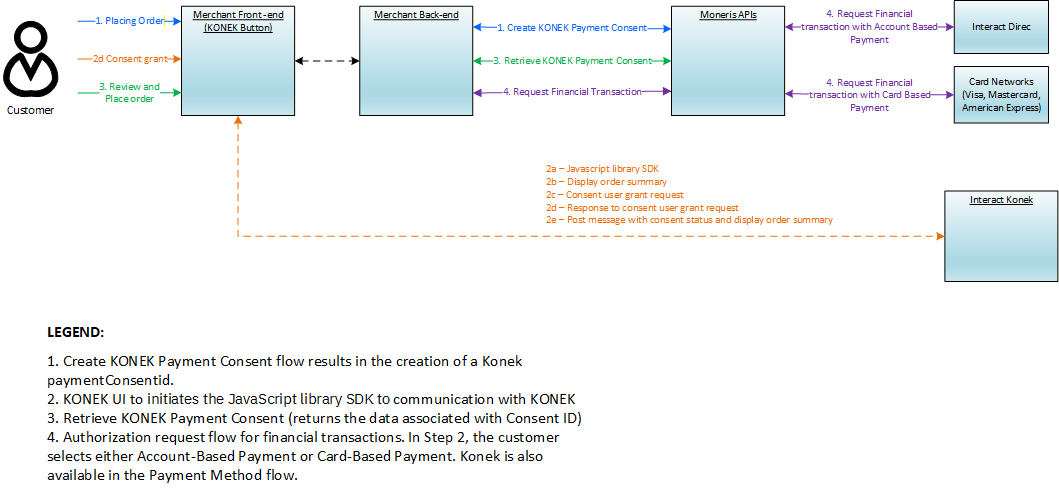
The flowchart below demonstrates the flow for API merchants looking to integrate with KONEK.
Implementing the KONEK SDK
Import the SDK
To import the merchant SDK, add a script tag in the section with the link to the konek-sdk.esm.js. This is only the entry script, which will detect the browser configuration and trigger imports for the rest of the optimized SDK JavaScript files.
<script type="module" src="https://sdk.fit1.konek.dev/konek-sdk/konek-sdk.esm.js"></script>Production SDK URL
When you go live, replace the certification URL above with:
https://sdk.konek.ca/konek-sdk/konek-sdk.esm.js
Add a "Pay with KONEK" Button
To add a “Pay with KONEK” button to a webpage, use the
<konek-button-v1 border-radius="4" height="34" width="100" color="black"></konek-button-v1>
Button Properties
Details about the properties of this button can be found in the KONEK Button Properties section.
Get a Reference to the HTML Element
Get the reference of an HTML element (konek-button-v1) using a document query selector. The reference is needed to attach different event listeners. The konekClient object should also be available as the element's client property because it is needed to dispatch events to trigger the checkout flow as well as for debugging purposes.
Button Events
Details about the events are covered in KONEK Button Events section.
Onclick event listener
The click event listener of the konek-button-v1 should be used make an API call to Create KONEK Payment Consent API. Call the addOverlay method of konekClient to render an overlay while other asynchronous tasks are being carried out behind the scenes.
// Add click event listener to konek-button
konek.addEventListener('click', event => {
  // 1. Show overlay message while continuing other async tasks
  konek.client.addOverlay();

  // 2. Call merchant BE to pass cart data
  try {
    let consentResponse = await fetch(MERCHANT_BE_URL, {
      method: 'POST',
      headers: {
        'Content-type': 'application/json',
      },
    });

    // 3. MERCHANT BE response
    const { consentId, correlationId, deviceProfileSessionId, totalAmount, merchantName } =
      consentResponse;

    // 4. Call setConsentData method of konek client
    konek.client.setConsentData({
      consentId,
      correlationId,
      deviceProfileSessionId,
      totalAmount,
      merchantName
    });
  } catch (e) {
    // 5. On error pass error code
    konek.client.setConsentError({ error: 'createConsentFailed' });
  }
});
There are additional merchant specific data that needs to be included in this create consent payload. Please see the Create KONEK Payment Consent schema in the Moneris API Specifications.
After a payment consent is successfully created from Moneris, it should respond back with consentId, correlationId, and transaction data for the consent. This response payload should be passed to konekClient using setConsentData method.
This will start the checkout flow by launching KONEK app, where remaining steps are completed. In the meantime, an overlay will be displayed over the merchant’s site with the status message. Finally, when the checkout is completed, or if it fails for some reason, appropriate events are dispatched by the konek-button-v1.
Handle Create Consent errors
In case of error,
createConsentFailedshould be passed tokonekClientusing thesetConsentErrormethod so the appropriate message will be displayed in the overlay.
Setup event listener for konekSuccess
konek-button will dispatch a konekSuccess event when KONEK is successfully loaded, and again when the checkout flow is completed and consent has a tokenized status. An event listener should be attached to handle the next steps.
konek.addEventListener('konekSuccess', event => {
  console.log(event.detail);
  // Continue to order review or payment confirmation
});
Event Code
| Event code ("event.detail") | Description |
|---|---|
konekLoaded | KONEK loaded successfully. |
konekCompleted | Checkout flow complete. Consent status is Tokenized. |
- To grab the payment info, the merchant should call Retrieve KONEK Payment Consent API.
- Based on the selected
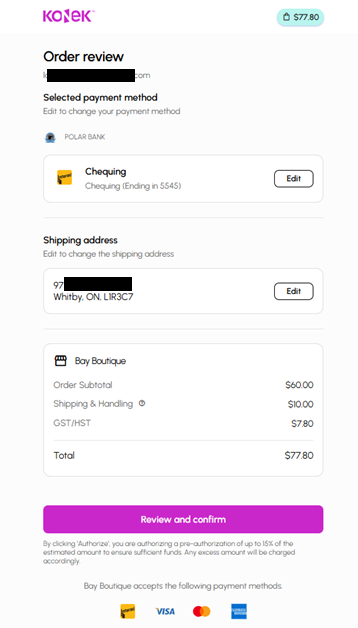
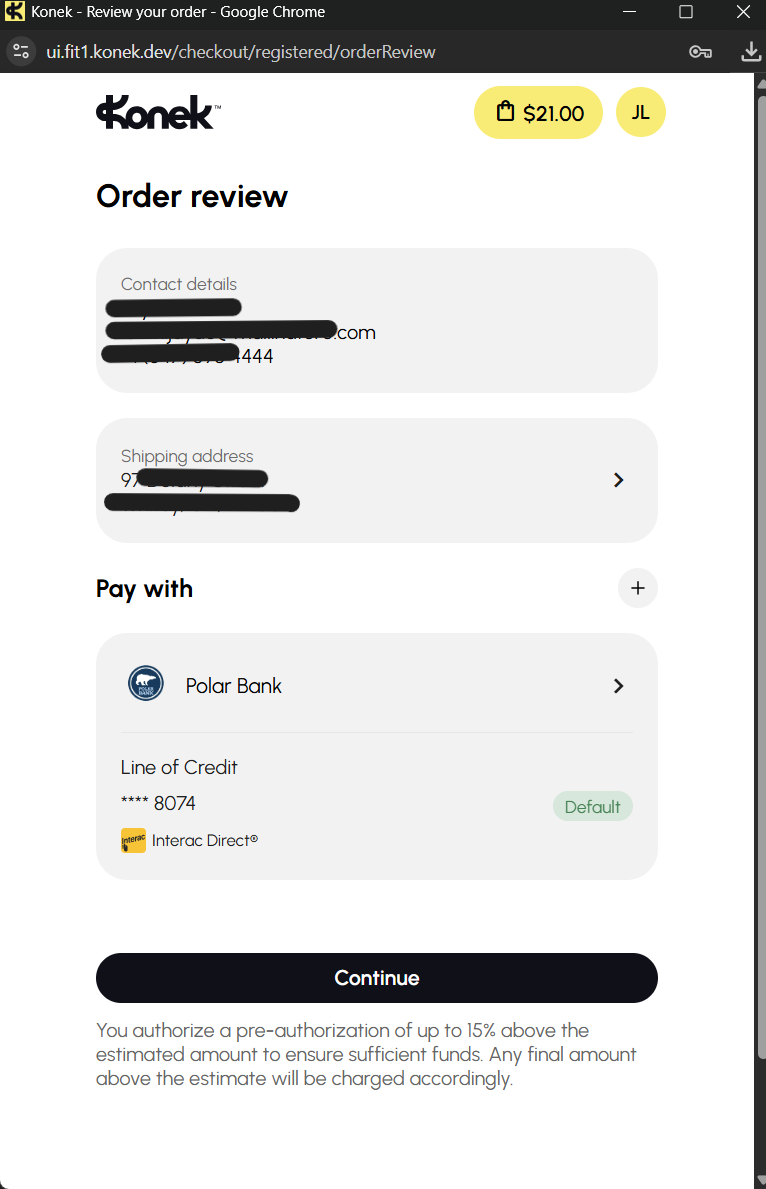
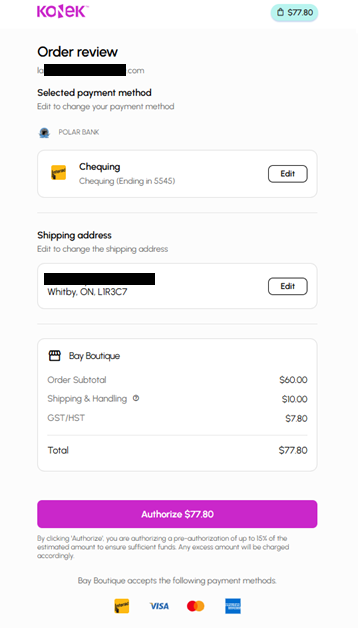
placementModefor the Create Konek Payment Consent by the merchant (Standard or Express), the situation will be handled in one of two ways:- Standard: After completing the KONEK flow, merchants should display an intermediary page showing the customer the payment details and ask them to review and confirm their order to complete the checkout. This is demonstrated in Figure: Standard Placement mode.
- Express: After completing the KONEK flow, merchants should submit the authorization and display a “payment complete” page with the transaction status and electronic receipt. This is demonstrated in Figure:Express Placement mode.
- Finalize the order with the Acquirer using the transaction data.
|
|
| Standard Placement mode | Express Placement mode |
Setup event listeners for konekError
Any error encountered during the checkout flow will trigger a konekError event on the KONEK button. An event listener should be attached to handle the different error scenarios. The details about the error are available in the detail property of the event object (see Table: Error Codes).
konek.addEventListener('konekError', event => {
  console.log(event.detail);
  // Handle error scenarios
});
References for KONEK objects
KONEK button properties
| Property | Description | Default | Data type |
|---|---|---|---|
| client |
It is needed to trigger the event to start the checkout flow. (Can be used for debugging purposes) | N/A | konekClient |
| border-radius | CSS property | 4 | Number |
| width | CSS property | Auto | Number |
| height | CSS property | 32 | Number |
| color | Button colour | Black | White / Black |
KONEK button events
| Event | Description | Event codes ("event.detail") |
|---|---|---|
konekInit | Dispatched when the button and client are fully loaded and ready to accept token information. | — |
konekSuccess | Dispatched when KONEK launches successfully, when the checkout flow completes, and when the consent is tokenized. | konekLoaded, konekCompleted |
konekError | Dispatched when an error or warning occurs during the checkout process. A full description of each event is available in Table: Error codes. | consentPayloadError, createConsentFailed, popupBlocked, konekLoadError, konekError, konekClosed, konekCancelled, konekWarning, konekHeartBeat |
Error codes
| Error code ("event.detail") | Description |
|---|---|
createConsentFailed | Create consent API call failed from merchant back-end systems. |
popupBlocked | A popup was blocked by the user’s browser or device. |
konekLoadError | KONEK failed to load. |
konekCancelled | The user cancelled a KONEK session by actively clicking on “Close and return to merchant” button. |
konekClosed | The KONEK window was closed by the user. |
konekError | Unrecoverable error on KONEK. |
konekWarning | Warning from KONEK. The user can still continue or retry to complete the checkout flow. |
konekHeartBeat | Pulse heartbeat sent from the merchant SDK to KONEK and its return acknowledgement. |
Moneris API KONEK
Create Konek Payment Consent
In the first phase, the cardholder places their order on the merchant's website and selects KONEK as the payment method. The merchant server uses the Moneris API call Create KONEK Payment Consent to obtain a KONEK paymentConsentid. Moneris API communicates to KONEK on the merchant’s behalf and relays details about the order to Interac.
This paymentConsentid is used within the KONEK SDK to ensure only authenticated merchants can display the log-in prompt for the KONEK frame. This call also supplies Moneris API and KONEK with the payment details of the order, the supported payment methods of the merchant, and the required contact information for the cardholder.
In the second phase, the merchant website initiates the JavaScript library SDK for KONEK. This calls the KONEK systems to display a login page for the user. The cardholder will input the credentials for the financial institution (FI) to log in to Konek. The UI will display the shopper’s available payment methods attached to their profile for selection, including both credit card products and bank accounts. The cardholder grants consent to the payment method within the user interface, which is communicated back to the KONEK system. The merchant website receives a POST message with the status of the consent and order.
Note:
The second phase describes the user interaction following the above API call, but is not itself an API call.
Your server does not call Moneris again during this phase. The KONEK SDK and KONEK systems handle the interaction directly with the shopper.
Retrieve Consent
The third phase begins as the cardholder reviews their order in the merchant website. The merchant server sends a Retrieve KONEK Payment Consent API call, with the paymentConsentid from the first step (see section Create Konek Payment Consent), to the Moneris API to validate the payment Consent. The Moneris API engages KONEK to return data related to the consent obtained within the Konek frame. The merchant website can redisplay order details obtained from this call as part of the cardholder confirming payment.
Process the Financial Transaction
The merchant can proceed with processing a financial transaction such as a Purchase or Preauthorization using the Create Payment API with Konek Payment.
- Account-Based Payments: Use the payment token and cryptogram returned with the consent to process a Purchase or pre-authorization through the Moneris API. Supplement the request with the data from the Pay By Bank (PBB) authentication. Refer to the Moneris API Specification for the full request schema.
- Card-Based Payments: For card-based payments, complete the financial transaction using the standard Moneris API endpoints, following each card network's rules. KONEK-initiated card payments may require new or updated fields on the authorization request — refer to the Moneris API Specification for the complete list.
Show the last four digits during confirmation
Moneris recommends developers retrieve the last four digits of either the bank account number or credit card number (PAN) used as the tokenized payment method. The merchant can display these digits to the customer as part of the order confirmation process to assure cardholders their payment method matches their selection within the Konek interface.
Learn more about responses with the link below
Testing Guidelines for Merchants
Obtaining test credentials
Merchants should reach out to their Moneris client consultant to enable KONEK on their Moneris API Store Profile prior to testing. For KONEK test users on the Certification Environment, Test FI, and test user credentials are included in this section. There are several test credentials required for Moneris merchants testing KONEK. A summary of these credentials can be found in table: Summary of KONEK Test Credentials. A description of each credential and screenshots of their place in the UI flow are included in this section.
Summary of KONEK Test Credentials
| Test credential name | Value | Refer to: |
|---|---|---|
| KONEK Merchant ID (MID) | CAMX001001 | N/A |
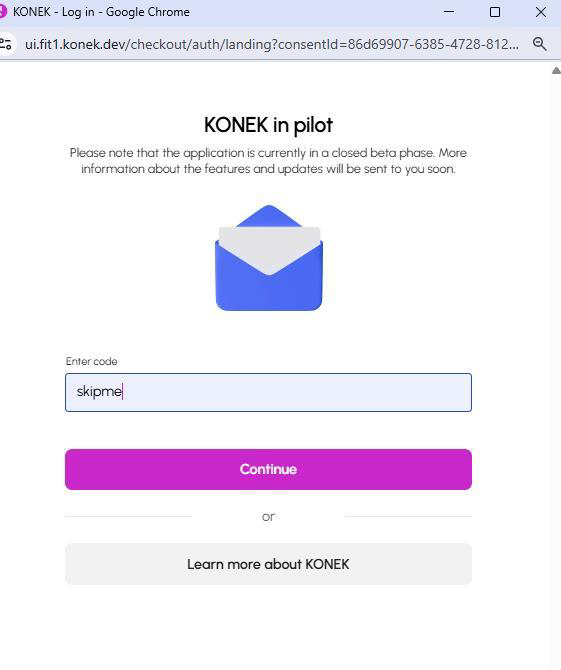
| Access Code | skipme | Figure: Access code for testing KONEK |
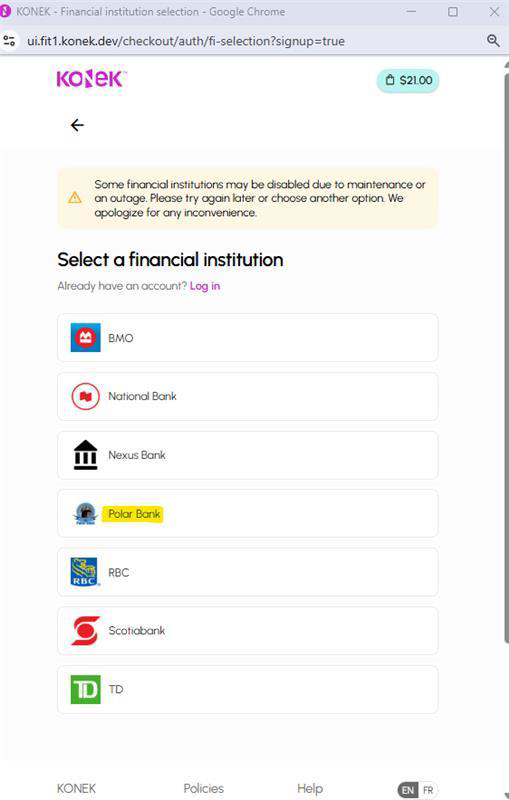
| Test FI Name | Polar Bank | Figure: Test FI for KONEK testing |
| Test User Credentials | – | The bulleted list below this table |
While testing the KONEK UI, the following test credentials are required:
- User name:
monerisuser - Password:
Moneris1! - Email:
[email protected]
All merchants on Moneris certification environment can use the same KONEK MID, listed in table: Summary of KONEK Test Credentials. This KONEK MID is required for KONEK API communication.
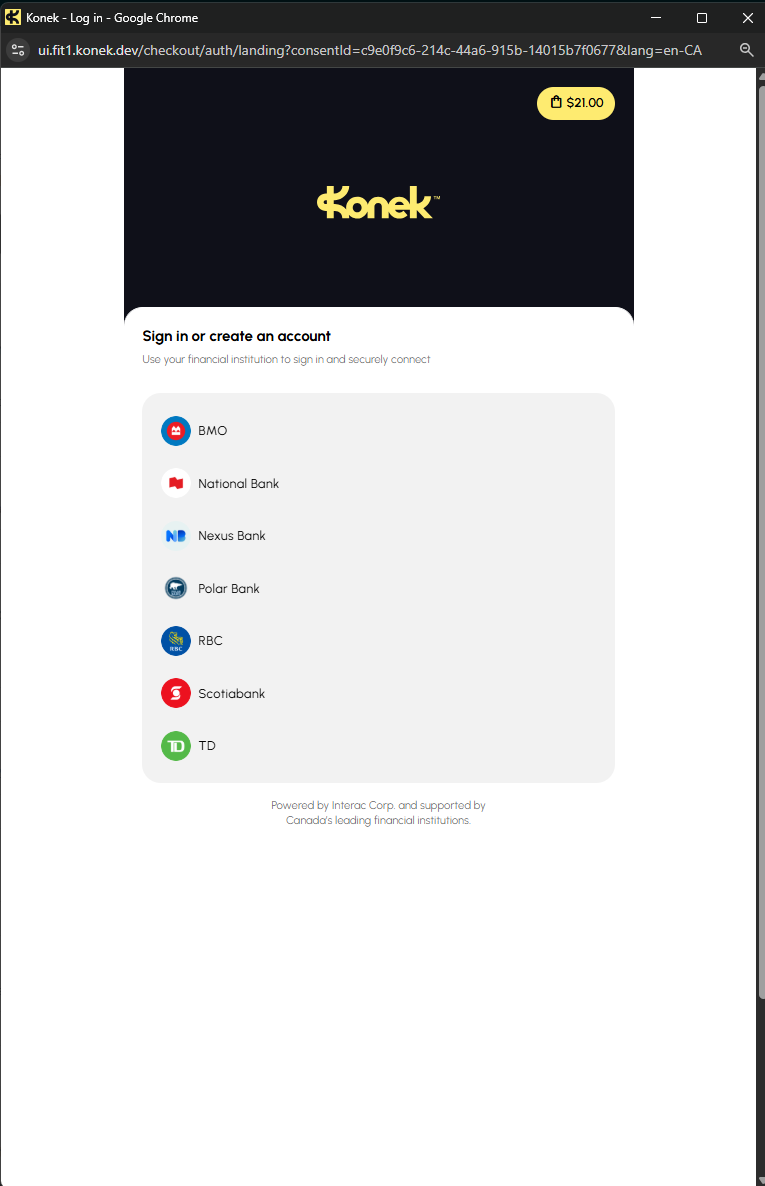
Additionally, testing KONEK requires a banking system simulation in the UI flow. Merchants should use the Test FI "Polar Bank" when conducting KONEK testing, as shown in Figure: Access code for testing KONEK. Merchants will require test user credentials which can be found in table: Summary of KONEK Test Credentials. Figure: Entering test user credentials at Polar Bank shows an example of test user credentials being entered into Polar Bank test page.
 |
| 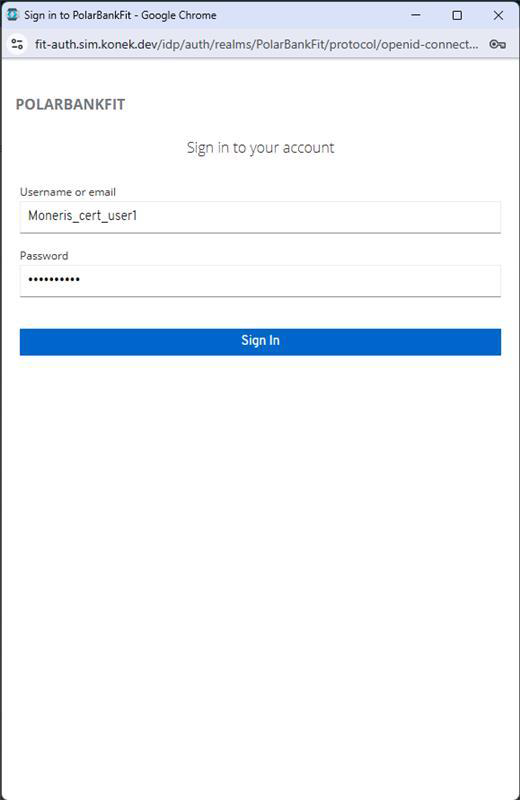 |
| Access code for testing KONEK | Test FI for KONEK testing | Entering test user credentials at Polar Bank |
Moving to Production
Once the solution is ready to be deployed from testing to production, the onboarding process will happen for KONEK and Interac Direct.
- The Pay with Konek option and Interac Direct card plan will be enabled on the Moneris API Store Profile. Merchants should contact their sales team/account manager for onboarding to KONEK and Interac Direct.
- When moving to production, merchants should replace the test SDK URL in section Import the SDK with the production one:
<script type="module" src="https://sdk.konek.ca/konek-sdk/konek-sdk.esm.js"></script> - Merchants will also need to use their Production KONEK Merchant ID (which is provided upon onboarding).
Additional Information
Learn more with the API Definitions
Peruse the endpoints, request/response formats, and authentication methods covered in this scenario.
Updated last month