

Setup Guide
Configuring Merchant Resource Center
The first step is to configure your Moneris Checkout page in the Moneris Merchant Resource Center (MRC).
During initial development, create a test configuration in the testing MRC. When your solution is ready for production, create a new and separate configuration in the production MRC.
The checkout ID is generated after configuration is complete and is used in the Preload Request to identify a specific Moneris Checkout configuration.
To generate the checkout ID and begin configuring your page, complete the following steps:
1. Login to Merchant Resource Center
Log in to the Merchant Resource Center using one of the following URLs:
| Environment | URL |
|---|---|
| Testing | https://esqa.moneris.com/mpg |
| Production | https://www3.moneris.com/mpg |
If you are using the testing environment, you can use one of the following test credentials:
Test IDs for Merchant Resource Center
| Username | Store ID | Password |
|---|---|---|
| DemoUser | store1 | password |
| DemoUser | store2 | password |
| DemoUser | store3 | password |
| DemoUser | store5 | password |
| DemoUser | moneris | password |
Test IDs for Merchant Resource Center - Convenience Fee Testing
| Username | Store ID | Password |
|---|---|---|
| DemoUser | monca00392 | password |
2. Access Checkout Config
In the admin menu, select Moneris Checkout Config.
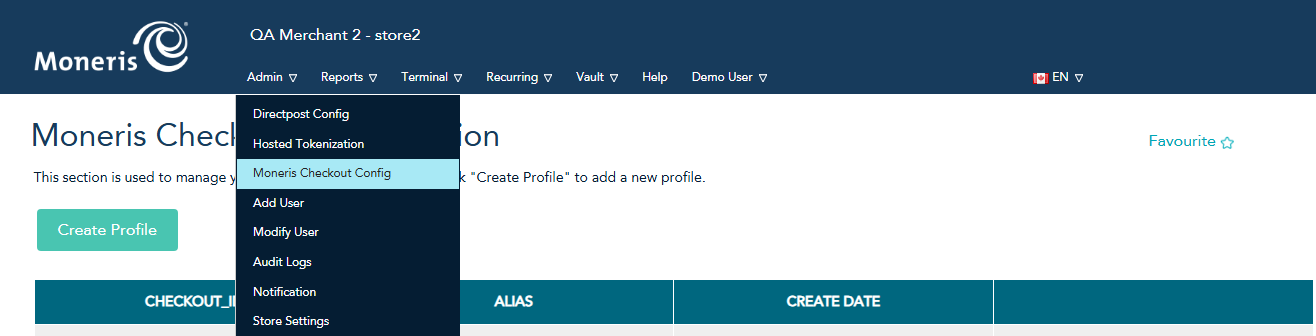
3. Create a profile
Click the Create Profile button.
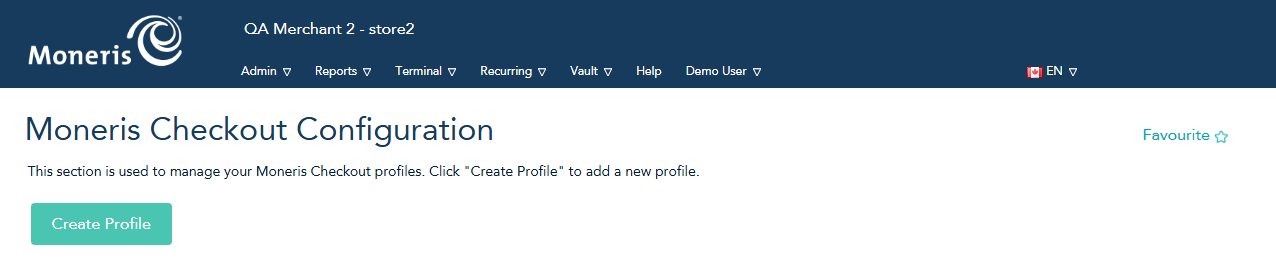
4. Configure and Save
Note the Checkout ID at the top of the page. You can save the default configuration and proceed, or customize the configuration based on your requirements.
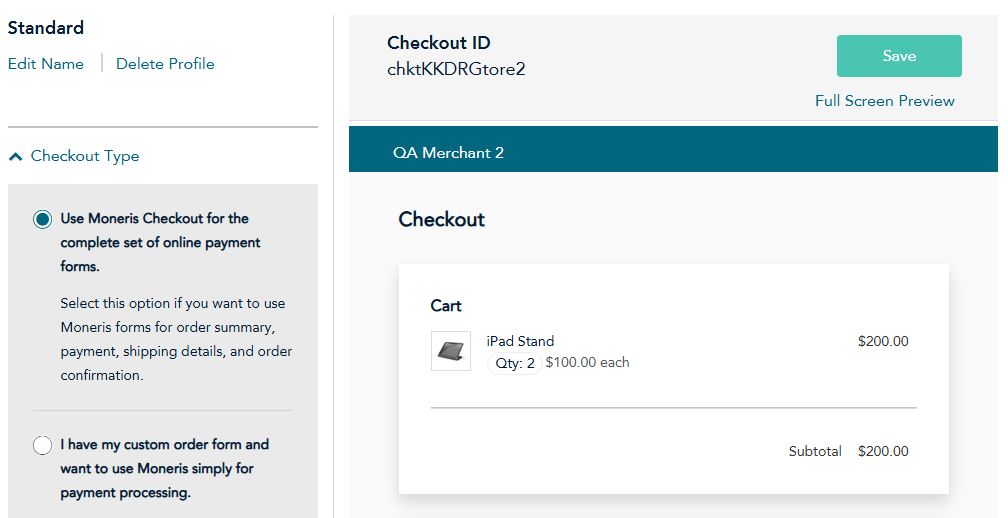
To customize your Merchant Resource Center configuration, refer to the Merchant Resource Center reference guide for more information.
Client-side checkout page
To prepare your client-side checkout page for Moneris Checkout, complete the following tasks:
Choose a version of the Moneris Checkout Library
Import the Moneris Checkout JavaScript library with a <script> tag. There are two integration options, depending on your organization's compliance requirements for script versioning and integrity. In both options, scripts are delivered over HTTPS and protected in transit, in addition to server-level integrity controls.
Option A: Standard Integration
This option ensures your integration always pulls the latest stable version of the checkout script from the Moneris CDN, and your HTML does not need to be updated when new versions are released.
<script src="https://gatewayt.moneris.com/chktv2/js/chkt_v3.00.js"></script>

Or minified:

<script src="https://gatewayt.moneris.com/chktv2/js/chkt_v3.00.min.js"></script>
<script src="https://gateway.moneris.com/chktv2/js/chkt_v3.00.js"></script>
Or minified:
<script src="https://gateway.moneris.com/chktv2/js/chkt_v3.00.min.js"></script>Option B: Sub-resource Integrity (SRI)
This option allows you to implement Sub-resource Integrity (SRI) for environments that require additional script integrity validation for compliance or internal security policies. With SRI, the browser verifies that the script contents match the provided hash value before loading the MCO form.
<script
    src="https://gatewayt.moneris.com/chktv2/js/chkt_v3.00.js"
    integrity="sha384-2Imusztg9T9G7DWhK7HYDWkOK3rbel4csnr3V5x1WDvEIKo+CO6kTi6naz21cbVw"
    crossorigin="anonymous"
></script>

Or minified:

<script
    src="https://gatewayt.moneris.com/chktv2/js/chkt_v3.00.min.js"
    integrity="sha384-/SFtfaZKoxmvtlAhg8OeYsit8YegNgyeR5AN6gc3x0Y43URbFtpo3MpLcE55F/ld"
    crossorigin="anonymous"
></script>
<script
    src="https://gateway.moneris.com/chktv2/js/chkt_v3.00.js"
    integrity="sha384-2Imusztg9T9G7DWhK7HYDWkOK3rbel4csnr3V5x1WDvEIKo+CO6kTi6naz21cbVw"
    crossorigin="anonymous"
></script>

Or minified:

<script
    src="https://gateway.moneris.com/chktv2/js/chkt_v3.00.min.js"
    integrity="sha384-/SFtfaZKoxmvtlAhg8OeYsit8YegNgyeR5AN6gc3x0Y43URbFtpo3MpLcE55F/ld"
    crossorigin="anonymous"
></script>Keep your implementation up to date
If you implement SRI, you must manually update your integration (HTML) when new MCO script versions and hash values are released, typically for major releases or important security updates.
Moneris will provide advance notice through standard release communication channels, aligned with Moneris support and change management policies, so your technology teams can assess and apply required updates.
These updates are required to maintain access to the latest MCO features, product enhancements, and security standards. If the script version and hash values are not updated when required, your integration may continue using an outdated script, which can affect checkout functionality or security.
Create the checkout container
Create a <div> with the ID monerisCheckout. The library uses this element to embed the checkout page.
By default, this opens the checkout page in full-screen mode:
<div id="monerisCheckout"></div>To use a custom window size, wrap the monerisCheckout container in a parent <div> and define dimensions:
<div id="outerDiv" style="width:400px; height:300px">
  <div id="monerisCheckout"></div>
</div>
Initiating Checkout
Set up an event to start the payment process (for example, a button click). This phase retrieves the secure Transaction Ticket from your backend, embeds the Moneris Checkout fields in the container defined above, registers callback handlers, and starts checkout.
// Fetch the secure Transaction Ticket from your backend server
const response = await fetch(
    "http://localhost:3000/api/initiate-checkout",
  {
    method: "POST",
  }
);
const data = await response.json();

if (!data.ticket) {
  throw new Error("No tickets returned from payment initialization endpoint");
}

// Initialize the Moneris Checkout instance and set the embed container
const myCheckout = new monerisCheckout();
myCheckout.setMode("qa"); // Switch to "prod" in production
myCheckout.setCheckoutDiv("monerisCheckout");

// Register required lifecycle and transactional callbacks
myCheckout.setCallback("page_loaded", handlePageLoaded);
myCheckout.setCallback("cancel_transaction", handleCancelTransaction);
myCheckout.setCallback("error_event", handleErrorEvent);
myCheckout.setCallback("payment_receipt", handlePaymentReceipt);
myCheckout.setCallback("payment_complete", handlePaymentComplete);

// Open the hosted payment interface in the container
myCheckout.startCheckout(data.ticket);
Server-to-Server Logic
There are two server-to-server calls required in the checkout process: one to initiate checkout and one to retrieve the receipt after checkout is complete. Both requests use the same endpoint, but with different request properties.
In your server implementation, use the following Moneris Checkout URLs to POST to, depending on the development stage:
| Environment | URL |
|---|---|
| Testing | https://gatewayt.moneris.com |
| Production | https://gateway.moneris.com |
Preload Request
The Preload Request securely generates a Moneris Checkout instance at transaction time. It is a server-to-server POST using the JSON format documented in Preload Request.
The Preload Request response includes a ticket number that uniquely identifies the checkout instance. Pass this ticket to myCheckout.startCheckout(ticketNumber) to display Moneris Checkout in the browser.
Note: The ticket number expires after 30 minutes.
POST /chktv2/request/request.php with the following body:
{
  "store_id": "store2", // Replace with your Moneris Store ID
  "api_token": "yesguy", // Replace with your Moneris API token
  "checkout_id": "chktBA8VTtore2", // Replace with your generated Checkout ID
  "txn_total": "100.00", // Total charge amount
  "environment": "qa", // "qa" for testing, "prod" for live
  "action": "preload"
}
For additional parameters, see the Preload Request API Reference.
Consider the following:
- Recurring Billing is not allowed when using Multi-Currency Pricing or Gift Cards.
- Billing-related fields are required when sending 3-D Secure authentication transactions, or else the authentication process may fail.
Receipt Request
After the payment_complete callback is received, your website can make the server-to-server Receipt Request call to retrieve transaction details for the receipt and determine whether the transaction was approved or declined.
POST /chktv2/request/request.php with the following body:
{
  "store_id": "store2", // Replace with your Moneris Store ID
  "api_token": "yesguy", // Replace with your Moneris API token
  "checkout_id": "chktBA8VTtore2", // Replace with your generated Checkout ID
  "ticket": "1782309276washiedRIyaLlbruGuR02UobXJXUAT", // Preload request ticket number
  "environment": "qa", // "qa" for testing, "prod" for live
  "action": "receipt"
}
For additional parameters, see the Receipt Request API Reference.
Handling Callbacks
Callbacks are the means by which Moneris Checkout communicates with your merchant checkout page. All callbacks include a single parameter defined as a JSON-formatted string.
In order to handle callbacks, you need to create JavaScript functions that receive the callbacks being sent by Moneris Checkout when the events occur.
Callback Response Fields
| Variable Name | Type and Limits | Description |
|---|---|---|
| handler | alphanumeric string | Describes the type of callback being used. |
| ticket | alphanumeric string | Identifies the specific Moneris Checkout instance. This is also returned in the response to the original Preload request. |
| response_code | alphanumeric string | Identifies the result of the callback. For information on response codes, see the Response Codes section of the API reference tab. |
Page Loaded Callback
Callback Use
To get the page loaded status of the Moneris Checkout page. This callback is called once the Moneris Checkout is loaded.
JavaScript set method for Callback
myCheckout.setCallback("page_loaded",myPageLoad);
Example JSON response:
{
  "handler":"page_loaded",
  "ticket":"1539961059DdrvGG3Yj7rxvMAgvRlc4nqKXF7YjT",
  "response_code":"001"
}
Cancel Transaction Callback
Callback use:
This callback is called in the event the cardholder presses the cancel button in Moneris Checkout. Standard is to call the closeCheckout() method to close the Moneris Checkout. The closeCheckout() method will need to be called and a new Preload request will be required in order to initiate a new Moneris Checkout instance.
JavaScript set method for callback:
myCheckout.setCallback("cancel_transaction",myCancelTransaction);
Example JSON response:
{
  "handler":"cancel_transaction",
  "ticket":"1539961059DdrvGG3Yj7rxvMAgvRlc4nqKXF7YjT",
  "response_code":"001"
}
Payment Receipt Callback
Callback use:
Transaction is complete and receipt is ready to be collected. If you have chosen to have Moneris Checkout generate the receipt, this callback is called once the Moneris Checkout displays the transaction receipt. If you have chosen Moneris Checkout not to generate a receipt, this callback will not be called. For information on when to obtain the receipt response for the transaction, refer to the Payment Complete callback.
JavaScript set method for callback:
myCheckout.setCallback("payment_receipt",myPaymentReceipt);
Example JSON response:
{
  "handler": "payment_receipt",
  "ticket": "1539961059DdrvGG3Yj7rxvMAgvRlc4nqKXF7YjT",
  "response_code": "001"
}
Payment Complete Callback
Callback use:
This callback is called once Moneris Checkout has completed payment. If you have chosen Moneris Checkout to generate a receipt, the cardholder has to return to your Checkout page in order for the callback to be called. For information on obtaining the receipt response for the transaction, refer to the Payment Receipt callback . Moneris Checkout should be closed by calling the closeCheckout() method
JavaScript set method for callback:
myCheckout.setCallback("payment_complete",myPaymentComplete);
Example JSON response:
{
  "handler":"payment_complete",
  "ticket":"1539961059DdrvGG3Yj7rxvMAgvRlc4nqKXF7YjT",
  "response_code":"001"
}
Page Closed Callback
Callback use:
Called when the user is on the payment page and has submitted payment, but tries to close the window, clicks the back button in the browser or reloads the page before the payment has been confirmed, causing a JavaScript error to occur.
Moneris Checkout should be closed by calling the closeCheckout() method. The payment proceeds, with no changes to the payment flow.
JavaScript set method for callback:
myCheckout.setCallback("page_closed",myPageClosed);
Example JSON response:
When the user closes the window, clicks back or reload in the browser:
{
  "handler":"page_closed",
  “response_code":"001"
}
When a JavaScript error occurs:
{
  "handler":"page_closed",
  "ticket":"1539961059DdrvGG3Yj7rxvMAgvRlc4nqKXF7YjT",
  "response_code":"001"
}
Payment Submitted Callback
Callback use:
This callback is called will be triggered when cardholder clicks Checkout button and payment processing is started.
JavaScript set method for callback:
myCheckout.setCallback("payment_submitted",myPaymentSubmitted);
Example JSON response:
{
  "handler":"payment_submitted",
  "ticket":"1539961059DdrvGG3Yj7rxvMAgvRlc4nqKXF7YjT",
  "response_code":"001"
}
Finalizing Checkout
Triggering Checkout
When a customer begins checkout, the Moneris Checkout page is displayed in the <div> container on your website.
To render the Moneris Checkout instance in the container, call myCheckout.startCheckout(ticketNumber).
Terminating Checkout
To terminate the Moneris Checkout instance, call myCheckout.closeCheckout().
Testing Your Integration
In the testing stage of development:
- Use the testing Merchant Resource Center at https://esqa.moneris.com/mpg to configure your Moneris Checkout page for testing purposes
- Use the testing URL for server to server requests:
https://gatewayt.moneris.com/chktv2/request/request.php - Reference the testing JavaScript library from Choose a version of the Moneris Checkout Library section of the documentation.
<script src="https://gatewayt.moneris.com/chktv2/js/chkt_
v2.01.js"></script>
<script src="https://gatewayt.moneris.com/chktv2/js/chkt_v2.01.js" integrity="sha384-jCchnHgslEZApz6/VsHOhc8KmLypSa5AnuZIAMkfPqAqlFpJw+LR9Tion5O/3tz6"
crossorigin="anonymous"></script>- Set your myCheckout object to the testing mode:
myCheckout.setMode("qa"); - In all requests use the value "qa" for the environment variable and make sure that you are using the testing version of your credentials for Store ID, API token and Checkout ID
Test Cards
When testing, you can use the following card numbers with any future expiry date.
| Card Plan | Card Number |
|---|---|
| MasterCard | 5454545454545454 |
| Visa | 4242424242424242 or 4005554444444403 |
| Amex | 373599005095005 |
| Diners | 36462462742008 |
Testing Convenience Fee/Service Fee
For testing transactions with convenience fee/service fee in Moneris Checkout, you must use the specific test credentials:
Store ID: monca00392
API token: qYdISUhHiOdfTr1CLNpN
Username: DemoUser
Password: password
3DS Testing
When testing 3D Secure implementation, please refer to the following documentation: https://legacy-developer.moneris.com/More/Testing/Testing%203D%20Solutions
Moving to production with MCO
Once you have finished testing your Moneris Checkout integration, do the following to move the integration to production:
- Ensure that you have duplicated you final testing configuration in your Moneris Checkout production configuration in the production Merchant Resource Center at
https://www3.moneris.com/mpg. - Use the production URL for server to server requests:
https://gateway.moneris.com/chkt/request/request.php - Use the production JavaScript library:
<script src="https://gateway.moneris.com/chktv2/js/chkt_v3.00.js"></script> - Set your checkout instance to the production mode:
myCheckout.setMode("prod"); - In all requests use the value "prod" for the environment variable and make sure that you are using the production version of you credentials for Store ID, API Token and Checkout ID.
Compliance Considerations
PCI DSS requirements may vary depending on your payment integration and implementation. Review the compliance requirements applicable to your organization before going live. For more information, see the Compliance page.
Updated last month