

Setup Guide
Configuring Merchant Resource Center
The Hosted Tokenization Configuration Tool, part of the Merchant Resource Center, is where you create and manage a profile for your hosted payment solution. Creating and configuring this profile are the first two steps in integrating Hosted Tokenization with your system.
Follow these steps to configure your Merchant Resource Center.
1. Log into the Merchant Resource Center
To use the Hosted Tokenization Configuration Tool, sign in to the Merchant Resource Center. Select the environment that matches your current stage of development:
| Environment | URL |
|---|---|
| Testing | https://esqa.moneris.com/mpg |
| Production | https://www3.moneris.com/mpg |
If you are using the testing environment, you can use one of the following test credentials:
Test IDs for Merchant Resource Center
| Username | Store ID | Password |
|---|---|---|
| DemoUser | store1 | password |
| DemoUser | store2 | password |
| DemoUser | store3 | password |
| DemoUser | store5 | password |
| DemoUser | moneris | password |
Test IDs for Merchant Resource Center - Convenience Fee Testing
| Username | Store ID | Password |
|---|---|---|
| DemoUser | monca00392 | password |
2. Navigate to Hosted Tokenization
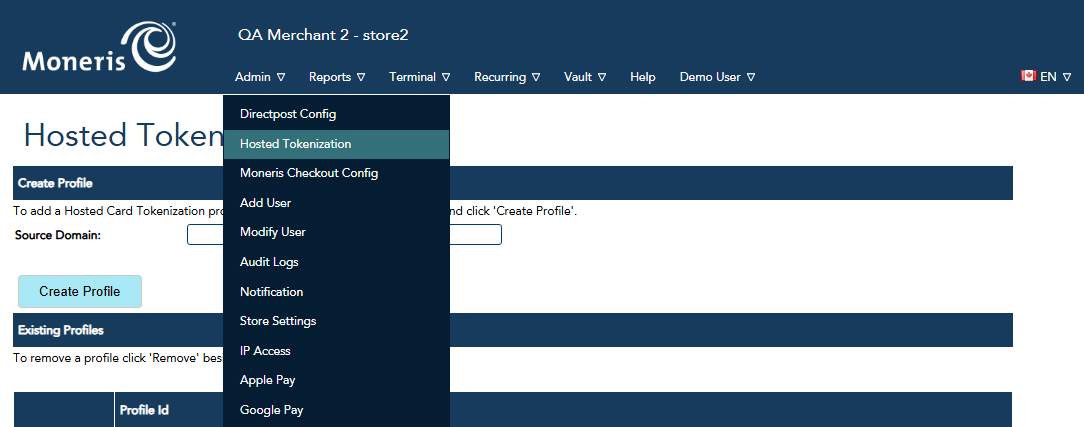
Open the Admin tab, then select Hosted Tokenization.
3. Create Profile
Click Create Profile.
Optionally, enter a source domain. This is the domain of the outer page that sends the transaction to Moneris Gateway (for example, example.com from the Overview page's process flow diagram).
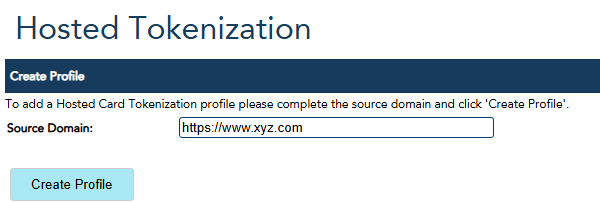
You can leave this field blank for mobile solutions or when the profile is used by multiple domains.
Record the generated Profile ID. You will include this value in your HTML iframe in a later step.
Getting a Temporary Token
To obtain a temporary token, send a request to Moneris from within an iframe. In the following example, replace ${profileID} with the Profile ID you received when configuring the Merchant Resource Center.
Setup
<iframe
  id="monerisFrame"
  src="https://esqa.moneris.com/HPPtoken/index.php?
    id=${profileID}&
    pmmsg=true&
    enable_exp=1&
    enable_cvd=1&
    display_labels=1"
  style="border: 0;"
  width="200"
  height="200">
</iframe>

<input type="button" onclick="doMonerisSubmit()" value="Submit iframe request">
Additional iframe request parameters
| Variable Name | Definition |
|---|---|
| id | Required - Provided by the Hosted Tokenization profile configuration tool in the Merchant Resource Center. |
| pmmsg | Recommended - Restricts accepted postMessage values to tokenize. Set to true to enable. |
| enable_exp | Set to 1 to display the expiry date text box. |
| enable_cvd | Set to 1 to display the CVD text box. |
| enable_exp_formatting | Adds a slash between month and year in the expiry date field (MM/YY). Set to 1 to enable formatting. |
| enable_cc_formatting | Applies card-number formatting by card type (for example, Visa: 4242 4242 4242 4242; MasterCard: 5454 5454 5454 5454; Amex: 333 666666 55555). Set to 1 to enable formatting. |
| display_labels | Dictates which labels to display. 0: no labels 1: default labels 2: custom labels. |
| pan_label | Custom text for the card number label. default: "Card Number" |
| exp_label | Custom text for the expiry date label. default: "Expiry Date" |
| cvd_label | Custom text for the CVD label. default: "CVD" |
| css_body | CSS applied to the body. By default, margin and padding are set to 0. Ex: background:blue;border:1px solid black; |
| css_input_label | CSS for input label. Ex: text-align:left;font-size:10px; |
| css_label_cvd | CSS for CVD label. Ex: text-align:left;font-size:10px; |
| css_label_exp | CSS for expiry date label. Ex: text-align:left;font-size:10px; |
| css_label_pan | CSS for card number label. Ex: text-align:left;&font-size:10px; |
| css_textbox | CSS applied to all text boxes in general. Ex: height:80px;width:300px; |
| css_textbox_cvd | CSS applied to the CVD textbox specifically. Ex: height:80px;width:300px; |
| css_textbox_exp | CSS applied to the expiry date textbox specifically. Ex: height:80px;width:300px; |
| css_textbox_pan | CSS applied to the PAN text box specifically. Ex: height:80px;width:300px; |
Request
Implement the function that sends the tokenization request from within the iframe.
function doMonerisSubmit() {
  const monerisFrame = document.getElementById("monerisFrame");
  const monerisFrameWindow = monerisFrame?.contentWindow;

  if (!monerisFrameWindow) {
    return false;
  }

  monerisFrameWindow.postMessage("tokenize", "https://esqa.moneris.com");
}
Response
The response returns a JSON object with the following four fields:
| Argument | Description |
|---|---|
| responseCode | Indicates page-load or card-submission status. If only the card number text box is enabled in the iframe, this value is a string. If expiry date or CVD fields are enabled, this value is an array of response codes (one per enabled input field). |
| errorMessage | Generic error description. For specific outcomes, refer to Hosted Tokenization error codes below. |
| bin | BIN range of the submitted card number. Use this to determine card type and apply card-specific processing rules. |
| dataKey | Tokenized card number. Use this value in your Vault API transaction. |
Hosted Tokenization Error Codes
| Code | Message/Description |
|---|---|
| 001 | Approved. |
| 940 | Invalid Profile ID (on tokenization request). |
| 941 | Error generating token. |
| 942 | Invalid profile ID, or source URL. |
| 943 | Card data is invalid (not numeric, fails mod10, we will remove spaces) |
| 944 | Invalid expiration date (mmyy formatted, must be current month or in the future) |
| 945 | Invalid CVD data (not 3-4 digits) |
Examples
{
  "dataKey": "ot-tAZSNHEDV4t4Rn6bonrripHm4",
  "bin": "545454",
  "responseCode": "001"
}
{
"dataKey": "ot-tAZSNHEDV4t4Rn6bonrripHm4",
"bin": "545454",
"responseCode": [ "001" ]
}{
"errorMessage": "invalid data",
"responseCode": [ "943" ]
}{
"errorMessage": "invalid data",
"responseCode": [ "945", "943", "944" ]
}Using a Temporary Token to Process a Payment
Forwarding Temporary Token
To charge the card using the temporary token you will need to send the token to a page on your site that implements the Moneris Vault API. First, we'll need to read it from the iframe response by adding a message event listener.
const monerisDomain = "https://esqa.moneris.com"; // Use "https://www3.moneris.com" for prod

window.addEventListener("message", function(event) {
  // A security check that only accepts messages from the trusted Moneris domain.
  if (event.origin !== monerisDomain) return;

  try {
    const response = typeof event.data === "string" ? JSON.parse(event.data) : event.data;
    const responseCodes = Array.isArray(response.responseCode)
      ? response.responseCode
      : [response.responseCode];

    // Handle a successful response:
    if (responseCodes.includes("001")) {
      // dataKey is the temporary token representing the card number.
      const dataKey = response.dataKey;

      // Pass the token to your payment processing page.
      processPayment(dataKey);
    } else {
      // Handle validation errors
      console.log(
        "Credit card validation failed with Moneris response code(s): " + responseCodes.join(", ")
      );
    }
  } catch (error) {
    console.error("Failed to parse message from Moneris.", error);
  }
});
Processing the Payment
To charge the card using the temporary token you will need to pass the token to a page the implements the Moneris Vault API. The Vault feature allows merchants to create customer profiles, edit those profiles, and use them to process transactions without having to enter financial information each time. Customer profiles store customer data essential to processing transactions. Vault supports both administrative transactions and financial transactions.
- Administrative transactions: these transactions manage stored payment profiles in the Vault and do not move funds. They are used to maintain customer payment information. Administrative transactions are used for tokenization and profile management, and the resulting data key is later used for payment processing.
- Financial transactions: these transactions use the stored Vault data key to process payments and involve the movement or authorization of funds. Financial transactions use the tokenized card information stored in Vault, eliminating the need to resubmit card details while maintaining PCI compliance.
For more details on the Vault API please refer to the Vault API documentation. The following are examples of transactions that can be performed with your token:
- Purchase with Vault ( API | Batch )
- Pre-Authorization with Vault ( API | Batch )
- Card Verification with Vault ( API )
- Vault Add Token ( API )
Testing a Hosted Payment Solution
How to Test a Solution
A testing environment is available while you integrate your site with Moneris Gateway. The test environment is available 24/7; however, because it is a development environment, 100% availability is not guaranteed. Other merchants also use this environment, so you may see transactions, user IDs, and Hosted Tokenization configurations that you did not create.
As a courtesy to other testers, use only the transactions, users, and configurations that you created when processing refunds, changing passwords, or testing other functions.
The test environment is designed to replicate production behavior as closely as possible. A key difference is that test transactions are not sent to the live authorization network, so issuer responses are simulated. To emulate approval, decline, and error scenarios, specific transaction variable values are required.
In the test environment, approval and decline behavior is based on the penny value of the amount field. For example, transactions for $9.00 or $1.00 are approved because the .00 penny value maps to an approval response. Transactions in the test environment should not exceed $10.00. This limit does not apply in production.
Test Cards
When testing, you can use the following card numbers with any future expiry date.
Test Card Numbers
| Card Plan | Card Number |
|---|---|
| MasterCard | 5454545454545454 |
| Visa | 4242424242424242 or 4005554444444403 |
| Amex | 373599005095005 |
| Diners | 36462462742008 |
Moving to Production
After you create and configure your profile, and complete development and testing, you are ready to move your solution to production.
Configure a Store for Production
Once you have activated your store, the next step is to point your store to the production host with the following steps:
- Update your HTML form action URL from QA:
https://esqa.moneris.com/HPPtoken/index.phpto Production:https://www3.moneris.com/HPPtoken/index.php. - Update
profile_idto your production Profile ID value.
In production, access the Merchant Resource Center at https://www3.moneris.com/mpg. Use the store administrator ID created during activation, then create additional users as required.
Compliance Considerations
PCI DSS requirements may vary depending on your payment integration and implementation. Review the compliance requirements applicable to your organization before going live. For more information, see the Compliance page.
Updated last month